Understanding Chunks
Chunks are one of the most fundamental concepts of Webpack. We already touched the topic at the Splitting Bundles chapter. There we set up two separate entries, one for the application code and one for our vendor dependencies.
With some additional setup Webpack was able to output separate bundles for these. We also did something similar with CSS as we separated it from our code to a bundle of its own in order to improve caching behavior.
Chunk Types
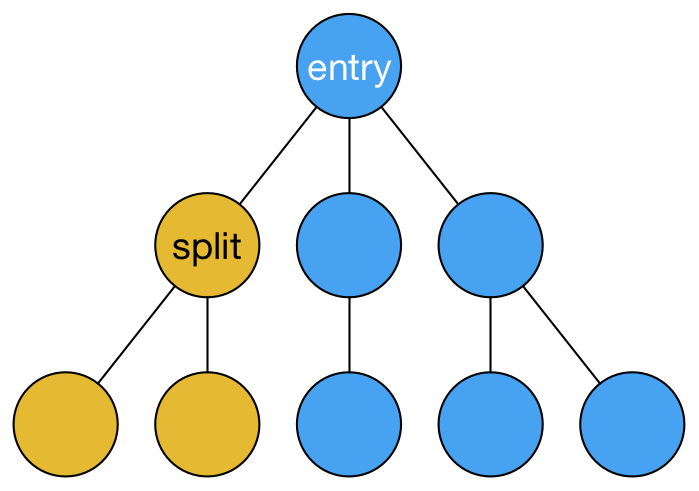
As discussed in the documentation, internally Webpack treats chunks in three types:
- Entry chunks - Entry chunks contain Webpack runtime and modules it then loads. So far we've been dealing with these.
- Normal chunks - Normal chunks don't contain Webpack runtime. Instead, these can be loaded dynamically while the application is running. A suitable wrapper (JSONP for example) is generated for these.
- Initial chunks - Initial chunks are normal chunks that count towards initial loading time of the application. These are generated by the
CommonsChunkPlugin. As a user you don't have to care about these. It's the split between entry chunks and normal chunks that's important.
Given we've covered how to deal with entry chunks already, I won't delve into that. Instead, I'm going to show you how to deal with normal chunks. They enable one of the most powerful features of Webpack, lazy loading.
Lazy Loading with Webpack
What makes Webpack powerful is its capability of splitting up your application into smaller chunks to load. This is far more flexible than standard concatenation. Even though concatenation works, it's not always a good approach. This is particularly true when the size of your application begins to grow.
Often you don't need all of the dependencies at once. As we saw earlier, you can split your dependencies and benefit from browser caching behavior. This is a good step, but it's not enough always. Your bundles can still be somewhat big. Lazy loading allows us to go further.
Introduction to Lazy Loaded Search with lunr
Let's say we want to implement a rough little search for our application without a proper search back-end. We might want to use something like lunr for generating an index to search against.
The problem is that the index can be quite big depending on the amount of the content. The dumb way to implement this kind of search would be to include the index required to the application bundle itself and then perform search against that.
The good thing is that we don't actually need the search index straight from the start. We can do something more clever. We can start loading the index when the user selects our search field.
This defers the loading and moves it to a place where it's more acceptable. Given the initial search might be slower than the subsequent ones we could display a loading indicator. But that's fine from the user point of view.
Implementing Search with Lazy Loading
Implementing this idea is straight-forward. We need to capture when the user selects the search element, load the data unless it has been loaded already, and then execute our search logic against it. In React we could end up with something like this:
App.jsx
import React from 'react';

export default class App extends React.Component {
  constructor(props) {
    super(props);

    this.state = {
      index: null,
      value: '',
      lines: [],
      results: []
    };

    this.onChange = this.onChange.bind(this);
  }
  render() {
    const results = this.state.results;

    return (
      <div className="app-container">
        <div className="search-container">
          <label>Search against README:</label>
          <input
            type="text"
            value={this.state.value}
            onChange={this.onChange} />
        </div>
        <div className="results-container">
          <Results results={results} />
        </div>
      </div>
    );
  }
  onChange(e) {
    const value = e.target.value;
    const index = this.state.index;
    const lines = this.state.lines;

    // Set captured value to input
    this.setState({
      value
    });

    // Search against lines and index if they exist
    if(lines && index) {
      this.setState({
        results: this.search(lines, index, value)
      });

      return;
    }

    // If the index doesn't exist, we need to set it up.
    // Unfortunately we cannot pass the path so we need to
    // hardcode it (Webpack uses static analysis).
    //
    // You could show loading indicator here as loading might
    // take a while depending on the size of the index.
    loadIndex().then(lunr => {
      // Search against the index now.
      this.setState({
        index: lunr.index,
        lines: lunr.lines,
        results: this.search(lunr.lines, lunr.index, value)
      });
    }).catch(err => {
      // Something unexpected happened (connection lost
      // for example).
      console.error(err);
    });
  }
  search(lines, index, query) {
    // Search against index and match README lines against the results.
    return index.search(query.trim()).map(match => lines[match.ref]);
  }
};

const Results = ({results}) => {
  if(results.length) {
    return (<ul>{
      results.map((result, i) => <li key={i}>{result}</li>)
    }</ul>);
  }

  return <span>No results</span>;
};

function loadIndex() {
  // Here's the magic. Set up `require.ensure` to tell Webpack
  // to split here and load our search index dynamically.
  //
  // The first parameter defines possible dependencies that
  // must be loaded first. Given there aren't any, we will
  // leave it as an empty array.
  return new Promise((resolve, reject) => {
    try {
      require.ensure([], require => {
        const lunr = require('lunr');
        const search = require('../search_index.json');

        resolve({
          index: lunr.Index.load(search.index),
          lines: search.lines
        });
      });
    }
    catch(err) {
      reject(err);
    }
  });
}
Even though there's a lot going on in this example, it's worth understanding. Webpack detect the require.ensure statically. It is able to generate a separate bundle based on this split point. Given it relies on static analysis, you cannot generalize loadIndex in this case and pass the search index path as a parameter.
The approach is useful with routers too. As the user enters some route, you can load the dependencies the resulting view needs. Alternatively you can start loading dependencies as the user scrolls a page and gets near parts with actual functionality. require.ensure provides a lot of power and allows you to keep your application lean.
T> require.ensure respects output.publicPath option.
T> Webpack 2 supports SystemJS semantics. We can use System.import('lunr').then(lunr => ...).catch(err => ...) kind of declarations there.
T> There's a full example showing how it all goes together with lunr, React, and Webpack.
Dynamic Loading with Webpack
Beyond require.ensure, there's another type of require that you should be aware of. It's require.context. require.context is a type of require which contents aren't known compile-time.
Let's say you are writing a static site generator on top of Webpack. You could model your site contents within a directory structure. At the simplest level you could have just a pages/ directory which would contain Markdown files.
Each of these files would have a YAML frontmatter for their metadata. The url of each page could be determined based on the filename. This is enough information to map the directory as a site. Code-wise we would end up with a statement like this somewhere:
// Process pages through `yaml-frontmatter-loader` and `json-loader`.
// The first one extracts the frontmatter and the body and the latter
// converts it into a JSON structure we can use later. Markdown hasn't
// been processed yet.
const req = require.context(
  'json!yaml-frontmatter!./pages',
  true, // Load files recursively. Pass false to skip recursion.
  /^\.\/.*\.md$/ // Match files ending with .md.
);
require.context returns us a function to require against. It also knows its module id and it provides a keys() method for figuring out the contents of the context. To give you a better example, consider the code below:
req.keys(); // ['./demo.md', './another-demo.md']

req.id; // 42

// {title: 'Demo', __content: '# Demo page\nDemo content\n\n'}
const demoPage = req('./demo.md');
This information is enough for generating an entire site. And this is exactly what I've done with Antwar. You can find a more elaborate example in that static site generator.
The technique can be useful for other purposes, such as testing. When you need a dynamic require, require.context works.
T> Note that Webpack will also turn statements written in the form require('./pages/' + pageName + '.md') into the require.context format!
Conclusion
Understanding how Webpack's chunking works helps you to untap a lot of its power. Just applying require.ensure alone can be very effective. It opens a world of possibilities. require.context has more limited possibilities, but it's a powerful tool especially for tool developers.